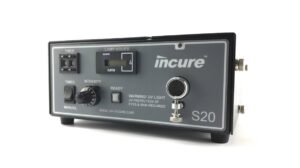
When working with glass adhesives, achieving strong adhesion and minimizing shrinkage are crucial for the success of your project. Glass is a challenging material for bonding due to its smooth surface and low surface energy, making the choice of adhesive and proper application techniques essential. Additionally, shrinkage after setting can affect the integrity and appearance of the bond. In this blog, we’ll explore the common issues related to glass adhesion and shrinkage, and provide practical solutions to ensure optimal results.
The Challenge of Glass Adhesion
Why Glass Adhesion is Difficult
Glass surfaces are notoriously smooth and non-porous, which can make it challenging for adhesives to form a strong bond. The low surface energy of glass often results in poor wetting and adhesion, requiring specialized adhesives and surface preparation techniques.
Common Adhesive Options for Glass
- UV Adhesives: Cure under ultraviolet light and offer strong bonds for glass surfaces. They are ideal for applications requiring transparency and precision.
- Epoxy Adhesives: Provide a strong, durable bond and can be used for glass bonding, especially when working with larger or more demanding applications.
- Silicone Adhesives: Offer flexibility and are often used for sealing and bonding glass in environments that experience movement or expansion.
Causes of Shrinkage After Setting
1. Chemical Shrinkage
Issue:
Some adhesives undergo a chemical reaction during curing that results in volume reduction. This shrinkage can affect the bond and create gaps or misalignment in the joint.
Solution:
- Choose Low-Shrinkage Adhesives: Select adhesives specifically designed to minimize shrinkage. Check the manufacturer’s technical data for information on shrinkage rates.
- Apply in Thin Layers: Applying adhesive in thin layers can help reduce the impact of shrinkage and ensure a more consistent bond.
2. Inadequate Curing
Issue:
Incomplete curing can lead to adhesive shrinkage as the material continues to react or dry after the initial setting. This can compromise the bond strength and lead to issues such as de-bonding or gaps.
Solution:
- Follow Curing Instructions: Adhere to the manufacturer’s guidelines for curing times and conditions to ensure full curing and reduce shrinkage.
- Use Proper Curing Equipment: Ensure that UV lights or other curing equipment are used as specified for the adhesive to achieve complete curing.
3. Temperature and Humidity Fluctuations
Issue:
Temperature and humidity changes can affect the adhesive’s curing process and lead to shrinkage or dimensional changes in the bond.
Solution:
- Control Environmental Conditions: Maintain stable temperature and humidity levels during the curing process to avoid issues related to shrinkage.
- Perform Curing in Controlled Environments: Where possible, use curing chambers or controlled environments to ensure consistent conditions.
4. Surface Preparation
Issue:
Poor surface preparation can impact adhesive bonding and lead to issues such as uneven adhesion or gaps that become more noticeable after curing.
Solution:
- Clean Glass Surfaces: Ensure that glass surfaces are thoroughly cleaned and free from dust, grease, or other contaminants before applying adhesive.
- Consider Surface Treatments: For challenging applications, use surface primers or treatments designed to enhance adhesion on glass.
Best Practices for Achieving Strong Glass Adhesion
1. Select the Right Adhesive
- UV Adhesives: Ideal for clear bonding and precise applications. Ensure that the UV light source and exposure time are adequate for the adhesive being used.
- Epoxy Adhesives: Suitable for high-strength applications. Choose a formulation with low shrinkage properties if shrinkage is a concern.
- Silicone Adhesives: Useful for flexible bonding and sealing applications, particularly in environments with movement or temperature changes.
2. Prepare the Surface Thoroughly
- Clean the Glass: Use appropriate cleaning agents to remove any contaminants. Isopropyl alcohol or other glass cleaners can be effective.
- Use Surface Primers: For challenging applications, applying a primer designed for glass can improve adhesion and reduce the risk of bonding issues.
3. Optimize Curing Conditions
- Maintain Stable Conditions: Keep curing environments stable in terms of temperature and humidity to prevent issues related to shrinkage.
- Ensure Proper Curing: Follow the manufacturer’s recommendations for curing times and conditions to achieve optimal bond strength and minimize shrinkage.
4. Monitor and Test
- Conduct Test Bonds: Before full-scale application, perform test bonds to evaluate the adhesive’s performance and ensure that it meets your requirements.
- Inspect Cured Bonds: Regularly check the bonds for signs of shrinkage or other issues and address any problems promptly.
Conclusion
Effective glass adhesion and minimizing shrinkage are essential for achieving strong, durable bonds in glass applications. By understanding the common causes of shrinkage and following best practices for adhesive selection, surface preparation, and curing, you can ensure successful results for your projects. Whether using UV adhesives, epoxies, or silicones, careful attention to detail will help you achieve optimal adhesion and performance.
If you have any questions or need further assistance with glass adhesion or adhesive selection, feel free to contact us. We are here to help you find the best solutions for your needs.


